
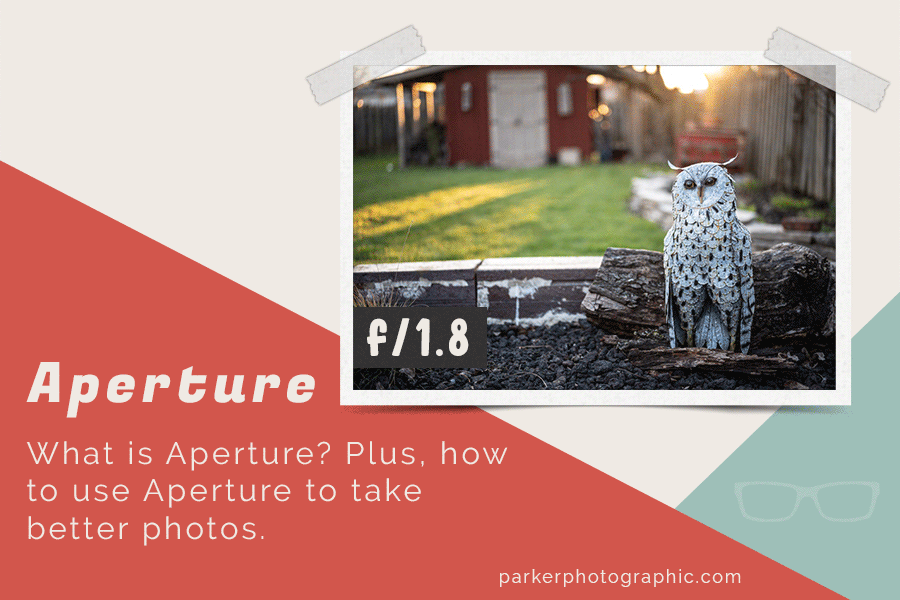
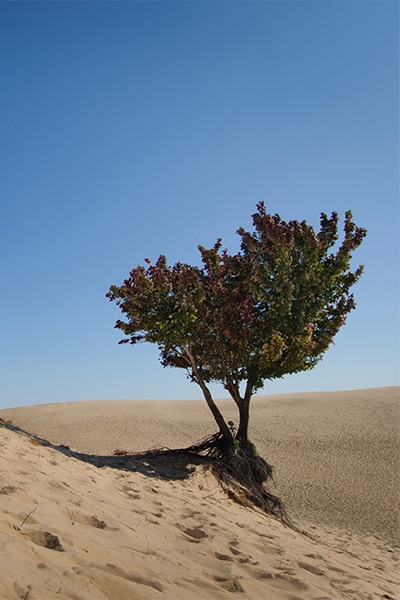
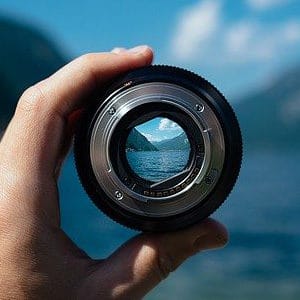
 Photo From Parker Photographic
Originally Posted On: https://parkerphotographic.com/what-is-aperture/
Plus, how To Use Aperture To Take Better Photos
Setting your aperture is one of three keys to better and creative photos. The other two are your ISO and Shutter Speed.
Do you want to create better, more creative photos?
But, maybe you find the aperture to be a bit mysterious?
- What is an aperture in photography?
- What do all the numbers represent?
- How do you use an aperture in photography?
All of these questions will be answered in this aperture guide.
Plus, some real-world challenges where you’ll learn how I navigate the world of apertures to get the photo I had envisioned.
Ready to get started? Awesome… let’s do it!
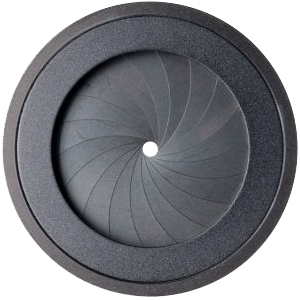
So, what exactly is an Aperture?In essence, an aperture in photography refers to the size of the opening in your lens. The opening allows light to be captured for your image.
The larger the opening, the more light that will be captured by your camera.
This “opening” is also known as an iris. Interestingly, an aperture works very similarly to the iris in your eyes!
When you walk into a dark room, the iris or pupil of your eye becomes larger to allow more light to become visible.
If you’re in a dark room and walk outside on a bright, sunny day, the opposite happens… your pupil (iris) becomes smaller.
We’ll explore the mechanical aspects of the Aperture (iris) later on in the article.
But first, let’s discover how the Aperture affects your photo’s exposure.
The aperture is made up of mechanical blades that increases or decreases in size depending on the aperture you select.

In humans, the iris is a thin, circular structure in the eye, responsible for controlling the diameter and size of the pupil and thus the amount of light reaching the retina.
How Does Aperture Affect Exposure?“Exposure – how bright or dark your image is.”
As mentioned previously, you can increase or decrease the amount of light that passes through to your camera based on the size of the lens aperture.
This can have a direct affect on your exposure if the aperture is too large or too small. That is if all else is equal, and you’re not adjusting your ISO and/or Shutter Speed. Let’s keep it simple and focus on the lens aperture for now.
For example, if too much light passes through the lens, you end up with an overexposed image. And, if not enough light gets to the camera sensor,
your image will be underexposed.
A perfect (or balanced) exposure is when the image is rich in details in both the highlights and shadows.
If you overexpose the image, you’ll lose details in the highlights. The opposite happens with an underexposed image. All the details in the shadows are lost.
The goal should be to capture a proper, balanced exposure in-camera. If not, you’ll end up with a lower quality image that you’ll have to try and fix in Photoshop (or Lightroom).
For example, if the details have been clipped at the time of capture, you can’t get them back.
Here are the results of only changing the aperture (each image shot with ISO 200 | 1/60th):

An aperture of f/1.8 allowed too much light to be captured and results in an overexposed image.
An aperture of f/2.8 allows the proper amount of light to be captured for a well-balanced exposure.
An aperture of f/4 doesn’t allow enough light to be captured and results in an underexposed image.
NOTE:There are a few factors that will determine if your details are clipped in addition to how much light enters via the aperture in the lens:
- The dynamic range of your camera
- Whether you’re shooting in JPEG or RAW
- Shutter Speed
- ISO
The aperture isolates the world you see and gives you the ability to craft your photos based on your creative vision.
Chris Parker
Before you select your aperture camera setting, you may want to consider the creative outcome. This will help you decide which aperture settings might be best for the final image.
For example:
- Do you want to blur out the background or keep it sharp?
- What about the foreground?
- Do you want your subject to be in focus or selectively in-focus?
You can harness the available light by adjusting
the size of the aperture.
Before the light, from your scene, reaches your camera’s sensor, you can manipulate that light based on your creative vision. In a way, you’re painting with light.
Think of how a painter uses different size brushes to create a masterpiece on canvas.
Your canvas is your camera’s sensor, and your paint is light. You can control how much light to paint with by changing the size of the aperture.
Plus, the different sizes of your aperture also gives you creative options for your final masterpiece.
There are specific aperture sizes that can be used to blur part of your image. And still, others that can enhance the sharpness of your photo.
We’ll explore these different lens apertures in more detail, with some real-world examples, later on in this aperture guide.

A large aperture was used to creatively blur out the background.
A small aperture was used to keep both the foreground and background in focus.
My creative vision for this shot was to keep a portion of the foreground in focus. What type of aperture did I use for this shot, small or large?
What is BOKEH, and How Can You Use It Creatively?Bokeh
“A photography term used to describe the characteristics of how the background looks when blurred out. Bokeh appears as little circles in the out of focus areas.”
Bokeh occurs when a light source is blurred out due to the length of your lens, the distance the subject (s) are to the lens and the aperture.
However, you can selectively choose a large aperture to enhance this effect with a shallow depth of field.
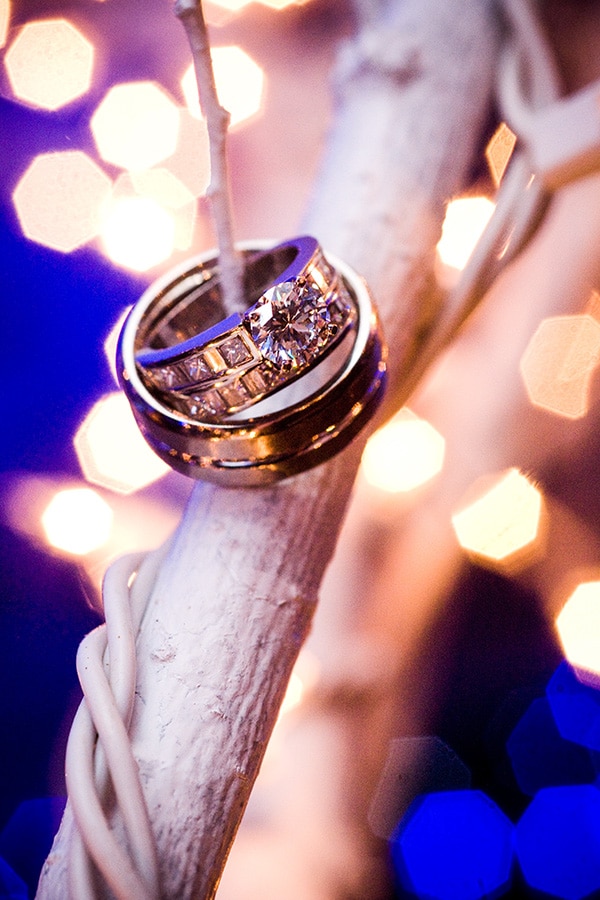
In this image, a macro lens was used with a large aperture. Due to the lights being very far from the lens, the Bokeh effect was created.
Also, the shape of the Bokeh can be round or the shape of the aperture itself.
What Is Depth of Field (To Aperture)?Depth-of-Field (DOF)
“The distance between the foreground and background that appears acceptably in focus.
A shallow DOF refers to a smaller area of the image in focus. A large depth of field refers to more of the foreground and background in focus.
Depending on the lens, aperture selected, and the distance to the main subject can affect how much of the scene is in sharp focus.”
Depth of field is a term used to describe how much of the scene is in focus or out of focus. This term is sometimes referred to as DOF.
The point at which you focus on is the starting point of the depth of field.
That focus point will be the sharpest part of the entire image.
Depending on the aperture used, parts of the image will become less and less in-focus.
This goes for both the foreground and background.
The focal length of your lens and the distance of the subject to the lens can also affect the depth of field (and Bokeh).
For example, a longer lens can achieve a similar depth of field compared to a large aperture.
If a background is very blurry, compared to the foreground, it’s known to have a “shallow” depth of field.
A larger depth of field is when both the foreground and background are sharp.
In the following image, the subject is completely in focus, and the background is blurred out.
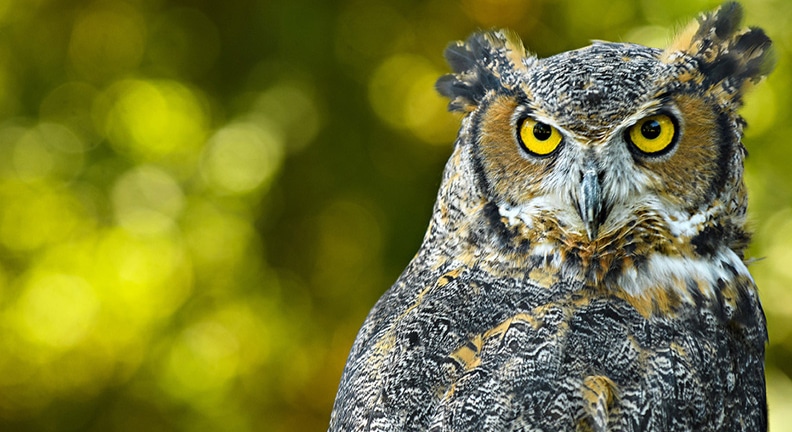
Nikon D300 | 1/1000 | ISO 200 | 70-200 | f/2.8 ///// Notice the Bokeh in this image? It’s subtle vs. the image of the rings (above).
Blurring out the background was done intentionally, with a large aperture, to separate the subject from the background.
Had I shot with a smaller aperture, rendering both the foreground and background in focus, there wouldn’t be any separation between the two.
This would result in our eyes not knowing what to focus on first, the background, or the foreground. It would be too busy.
In this case, the owl is the most essential part of the image. Therefore, by blurring out the background, the owl pops off of the background, and our eyes gravitate to it.
TIP: Remember the following when you want to use the aperture creatively…
…a large aperture results in a small depth of field. Or more blur.
…smaller apertures result in a large depth of field. Or more in focus.
NOTE:Depth of Field is not affected just by the aperture. Other things come into play as well.
- the distancing and positioning of your subjects with each other and other elements in the scene
- the focal length of your lens
- the distance between your subjects in regards to the background and/or the foreground
F-Stop
“The f-stop refers to a specific number that correlates to the size of the aperture. These numbers help you choose the aperture size you want based on your desired outcome.”
Up to this point, we’ve discussed the aperture in general terms: large, small, opening, hole, etc..
However, there is another term you should become familiar with, which is “f-stop.” It’s sometimes referred to as an f number.
There are two parts to the f-stop: the “f” and the “stop.” Both have different meanings. Let’s go over both.
Here’s a list of standard f-stops.f/1.2, f/1.4, f/2, f/2.8, f/4, f/5.6, f/8, f/11, f/16, f/22
Plus, today’s modern digital cameras (and lenses) allow us to dial in apertures in-between the standard f-stops.
For example, f/4.5 and f/5.
Note: There are other f-stops as well, and not all lenses have the same amount of f-stops. It depends on the lens itself.
f/1.4
f/2.8
f/4
f/11
f/16
TIP: aperture numbers are a fraction of the length of your lens!
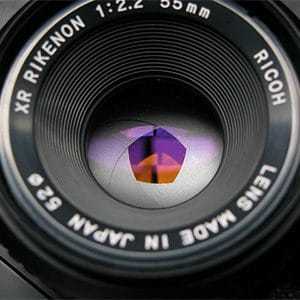
What the “f”“f” in f-stop is short for focal length. Lenses come in all different sizes (focal lengths).
My two favorite types of lenses are the Nikon 50mm and 85mm. The 50 and 85 represent the focal length of those lenses.
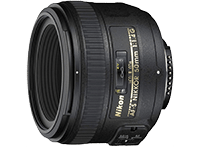
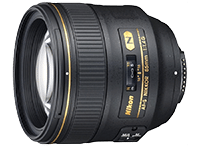
The Nikon 50mm is shorter than the 85mm (image to the right).
Why does this matter? Well, it will help you understand the creative outcome of your image based on the aperture selected.
Let’s find out how…
First, take a look at the apertures, and their corresponding f numbers, with the images to the left.
Notice anything weird about the aperture size and the f numbers?
According to the images, 4 is LARGER than 16!
“Wait a minute,” you say. “That’s not true!” You’re right.
16 is definitely larger than 4 when comparing a number to another number.
But, not in the world of apertures.
Have you ever wondered why an f-stop is written like this f/4 vs. 4?
Here’s why.
Two things are listed before the number; an “f” and a forward slash: f/
We’ve already established that “f” = focal length.
Then what does the forward-slash mean? Well, it’s known as the sign for division.
Uh, oh! We’re fixin’ to do some math. No worries, though. You don’t need math to take great photos. This is just for educational purposes.
So, the f-number is an equation: focal length divided by “the aperture number.”
Let’s try it out with a 50mm lens, and we’ll do some math for f/4 and f/16. Which is larger, f/4, or f/16?
The focal length of the lens is 50. So, we divide 50 by 4.
The equation looks like this: 50(f) / 4 = 12.5
Then, 50(f) / 16 = 3.125
So, 4 is actually larger than 16! Well, at least f/4 has a larger aperture vs. f/16.
Hopefully, this helps you remember that the smaller the f-number, the larger the aperture and vice versa.
Photo by Lisa Fotios
What’s A “Stop”?When photographers refer to stops, they’re talking about doubling or halving the amount of light that goes through the lens and reaches the sensor of the camera.
For example, if I say I’m going to increase the exposure by 1 stop, it means that I’m adding twice as much light to the exposure.
Or if I’m going to decrease the exposure by 1 stop, it means that I’m using less light or half as much.
Things seem to get complicated when you consider that you’re not really doubling or halving the amount of light… at least when it comes to the aperture.
For a detailed explanation of why this is, I have the perfect article for you titled; What Does a “Stop” Mean In Photography? (coming soon).
NOTE:You can also double or halve the amount of light with the shutter speed or ISO.
Two More Photography Terms You Should Know…
As you adjust your aperture from a large hole down to a small aperture (the “hole”), it’s known as “stopping down.” You may also hear photographers refer to it as “closing” down.
Basically, you’re reducing the amount of light passing through the lens in half, with each stop.
If you stop down from f/4 to f/5.6 that’s one stop and you’re cutting the amount of light in half. Stopping down from f/4 to f/8 is two stops.
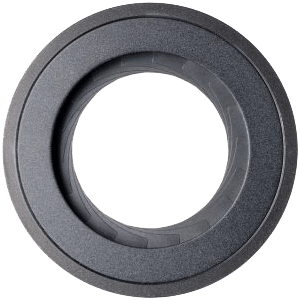
This next image shows the aperture fully open or also known as wide open (sometimes referred to as the maximum aperture). No blades are visible.
This allows the maximum amount of light to be sent through the lens to the camera.
The Moving Parts Of Your ApertureThis is just a quick overview of a couple of parts that are related to the aperture. We’ll get into the real-world examples very soon. Promise!
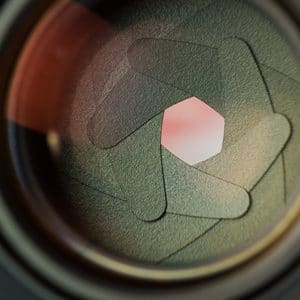
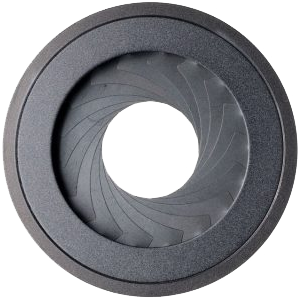
Here we have a small aperture, and you can visibly see the blades.
the BladesThe aperture itself is made up of a series of blades inside of your lens.
These blades are arranged to allow a certain amount of light to pass through.
As you adjust the aperture size, the blades will recede or advance in increments. These increments are referred to as an f-stop.
The opening at the center of these blades is the aperture.
Video Player00:0000:00
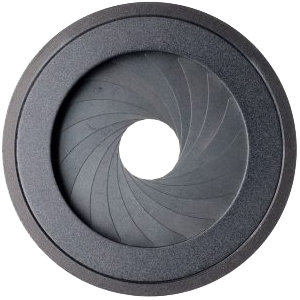
the irisThe iris is the mechanism that allows you to open or close the aperture. The iris consists of the blades themselves and the ring used to adjust the size of the aperture.
As you can see, in the video, as I adjust the aperture size, it’s being modified in a circular motion.
The lens I’m demonstrating allows me to adjust the iris directly on the lens. Not all lenses have this option.
If yours doesn’t, then the iris can only be adjusted directly with your camera settings.
Quick Tip For Selecting Specific Apertures Based On Your Creative Vision.It doesn’t matter what type of photography you’re into. The size of your aperture will have the same effect. But your lens choice can affect your depth of field differently!
“Insert” your photography genre.
Do you want to blur out the background, foreground, or both?
Do you want faces to be tack sharp?
Or do you want to style your images, creatively, with selective focus?
Blurring out the background can be achieved with a shallow depth of field.
Either by using a long lens, moving the subject further from the background, or using a (large) wide aperture.
The size of the aperture will also allow you to use selective focus for additional creative options.
A lens aperture of f/2.8 or larger (2, 1.4, 1.2, etc.) will “blur” the background and give you the creative result you desire.
But, if you want the background and your subjects to be in focus, you’ll need a smaller aperture. Like f/5.6, f/8, f/16, etc.
When In Doubt Use Aperture Priority ModeShooting in full manual mode gives you complete creative control. However, if you’re new to photography, it can be overwhelming trying to set your ISO, Shutter Speed, and Aperture at this time.
Instead, give aperture priority mode a try. Most modern cameras have an aperture priority mode.
So, what is an aperture priority mode? Glad you asked!
Aperture priority mode gives partial creative control to your camera.
First, you’ll select your preferred aperture, and the camera will set the shutter speed. Oh, and you’ll need to still set the ISO too.
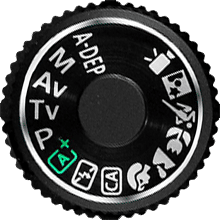
Canon aperture priority mode can be set via the “Av” option located on the dial or via the digital screen.
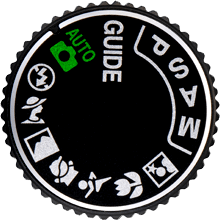
Nikon aperture priority mode can be set via the “A” option located on the dial or via the digital screen.

In total, we have 3 real-world examples to demonstrate how you can use apertures creatively. Before we get into those examples, we need to have a little discussion first.
Why?
Well, we need to establish the “why” of the photo(s).
Knowing why will make it easier to choose a wide aperture or small aperture for your desired outcome.
In other words, what is your creative vision for the shot?
Or what is the intended purpose of the photo?
Deep DiveIt’s easy just to show you a couple of photos and say use a wide aperture for this result and a small aperture to achieve this.
Instead, I want to go deeper. Actually, I want you to think about the shot before you shoot.
Oh, the horror!
Knowing what you want and why will make choosing the correct aperture, for the job, easier.
You won’t have to think about it since you already thought about it. Confusing right?
So, instead of just giving you some pics and f-stop numbers, I’m going to tell a story about the photos… and the “why” behind it.
Plus, we’re going to flip the switch from the most common application of selecting an aperture and be different.
This way, you can see the difference and know why to use a specific aperture to improve your photography.
Using Apertures In the Real-World – Portrait PhotographyIt was a cold winter day, and the sun was tucked away behind the clouds. The last thing my son (Braydun) wanted to do was pose for photos.
But, I had to get the shot.
The background consisted of our shed and a fence behind it. Attire was a typical winter jacket all in black.
The first thing I decided to do was use the maximum aperture available to blur out the background (first image).
It was necessary to add separation between the background and Bray. Otherwise, the overall image would have been too busy.
Oh, and since I already decided that a b&w image would be best, it was another reason to use a larger aperture (larger = more out-of-focus). Ask me why in the comments.
I strapped on a 50mm lens onto my Nikon d300. The maximum aperture for this lens is 1.4. Perfect.
ISO 200, for minimal digital noise since ISO 100 was not available on this camera.
Although it had “low” ISO settings, I’d rather stick with a standard-setting. 200 it is.
Last, I had to figure out the shutter speed. Although it was cloudy, it was still fairly bright.
Plus, the wide aperture was letting in a LOT of light.
This meant I had to use a very fast shutter to counter the large aperture.
I started with 1/2000 of a second and checked the internal light meter.
I was 1 stop overexposed. This meant I needed a speed of 1/4000 of a second for a proper exposure.
It also helped that I used the center-weighted spot meter. This allows the light meter to focus on the light in the center of the viewfinder.
If I had used matrix metering (evaluative metering for a Canon camera), it would have taken all the light in the frame into consideration.
This means the bright snow would have tricked the light meter and would have yielded a very underexposed image.
As you can see, in the first image, the background is blurred out enough to create the separation needed.
This allows our eyes to focus on the subject of the photo.
Check out the second image, and you can see how the small aperture (f/5.6) doesn’t separate the background and subject as much.
This causes the background and subject to compete for our attention.
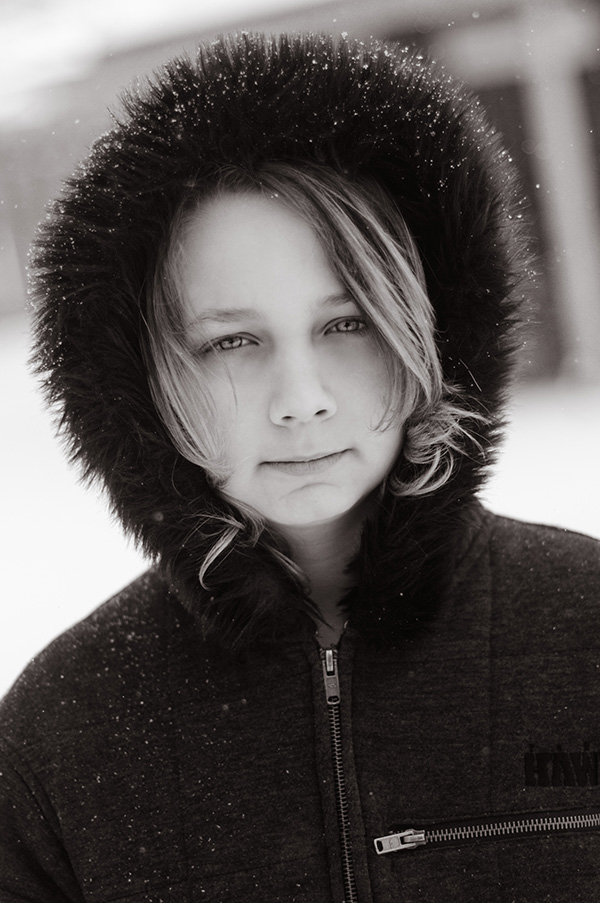
Nikon D300 | ISO 200 | 1/4000 | 50mm | f/1.4
 Smaller aperture @ f/5.6
Nikon D300 | ISO 200 | 1/250 | 50mm | f/5.6
Using Apertures In the Real-World – Landscape PhotographyOur final family camping trip of the year, in late August, took us back to one of our favorite locations: Letchworth State Park.
Letchworth is known as the Grand Canyon of the east. This particular spot is a popular destination for all to see.
We’ve been down this trail many times, and I wanted to capture this image to hang in our family living room.
As with most landscape photos, I wanted both the foreground and background to be sharp. Lots of detail.
A small aperture was needed to allow less light to go through the lens. One problem. It was very dark in the shade vs. where the sun was shining bright.
I needed to expose for the highlights to capture all that detail in that part of the scene. However, that meant all the detail in the shadows would have been clipped.
Although f/11 or f/16 would have been preferred, I needed to compromise and still ensure no detail was lost.
After a few test shots, I determined that f/5.6 would give me enough detail in the foreground and render it in-focus.
But, I still erred on the side of caution and exposed for the bright sun.
Since this was going to be a large wall print, I needed a small ISO to minimize noise. ISO 100 seemed ideal.
Now, to dial in the shutter speed. With no tripod in-sight, I had to make sure the shutter was fast enough to eliminate camera shake.
With these settings, I realized the shutter speed was too slow and would create that dreaded camera (shake) blur.
I could have allowed more light in by using a larger aperture (f/4, for example). But, it would have begun blurring out the foreground.
Instead, I decided to bump the ISO one stop from 100 to 200. The new ISO amplified the light enough to allow for a faster shutter speed.
I settled on 1/90th of a second. No camera shake and in sharp focus. Success!
Although this was one of those times, I didn’t nail the exposure in the camera.
The dynamic range between the highlights and shadows was more extensive than my Nikon D200 could handle.
This resulted in a lot of work in Lightroom to bring out all the details…

 OriginalEdited In Lightroom
Nikon D200 | 1/90 | 12-24 | ISO 200 | f/5.6. This image will not win me any rewards. Instead, the reward is the family memory!
Using Apertures In the Real-World – Wildlife PhotographyMy idea of wildlife photography consists of critters that scamper through our campground and visiting our local zoo.
Guess where this next photo was taken? Yep, Letchworth.
This little critter was hanging out on our firewood on a cloudy day.
Although the color of the lizard was sufficient for separating it from the foreground and background, I still wanted to blur out both.
This can only be achieved with a… that’s right, a large aperture. But, not as large as you may think is required.
I hooked on my Nikon 60mm lens that has a maximum aperture of f/2.8.
You would think, based on looking at the photo, that 2.8 wouldn’t be large enough.
What would be even more surprising is the fact that I used f/4 to blur out the foreground and background!
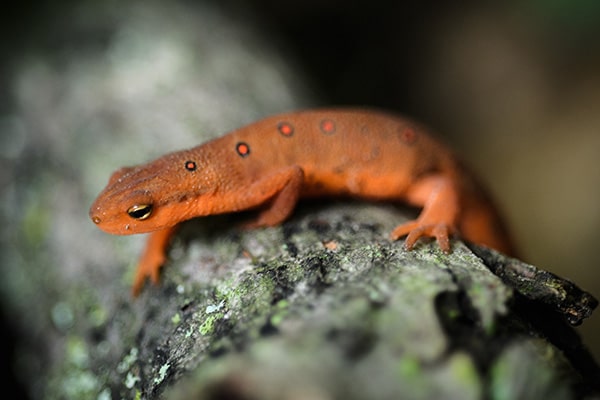
Very little of the creature is in focus.
However, that was the creative vision I had for the shot.
How did I do this?
Ask, and you shall receive… post in the comments and I’ll share the secret.
Oh, and in case you’re wondering, I used an ISO of 400 and a shutter speed of 1/60th of a second.
Why do you think I chose those two settings?
Post in the comments your thoughts on the camera settings used.